Painting the Kitchen Cabinets

Would you like to save this?
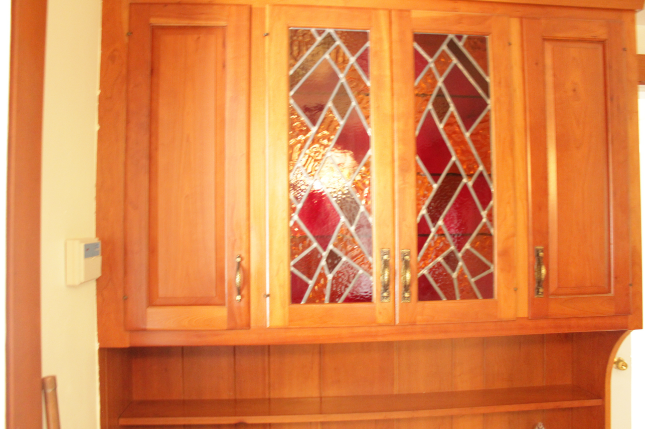
Last week, I showed a couple of photos of the kitchen in my new house, which is not exactly what you’d call updated, or even of this era. If my dishwasher were a car, it’d be a ’65 Chevy. Here they are again:
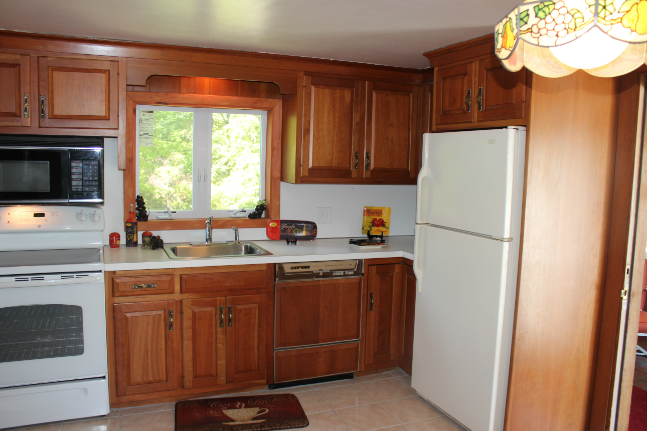
And, while the room still has a long way to go before it’s the kitchen of my dreams, I did make a huge update since we moved in: I painted the cabinets. All of them, inside and out. I also changed the hardware, and gave the wood paneling that covers half of the walls a fresh coat of paint, too.
All in all, it cost about $400, and about three days of my* life, but the results were SO worth it because my kitchen no longer feels like a dark little cave.
*By MY life, I mean the lives of me and my mother-in-law, who lives in Chicago, and spent half of her visit to our new house graciously helping me with this crazy project. She also built us a bathroom shelf from scratch, bought me new towels, and organized my linen closet, NBD.
Before I decided to take a DIY approach to this, I read a bunch of tutorials online about how to do it the right way. I wanted to make sure the cabinets looked at least vaguely professionally painted. But, the tutorials totally scared me off. They each required about 18 steps and weekends, plural. So, I decided to get a few quotes for professional cabinet painting, which came back at about $3,000. Which is how I decided I’d take on an 18-step project.
Luckily, in the end, we were able to slightly simplify the who thing, because by MIL found an all-in-one kit at Home Depot, which had everything we needed for the project. It was called Rustoleum Cabinet Transformations, and it actually made the whole thing sound fairly simple. Take the doors off the cabinets, wipe them down with a “de-glazer,” wipe them off again with a cloth, paint, paint again, and seal. So here’s how it actually went (for the most part, according to plan).
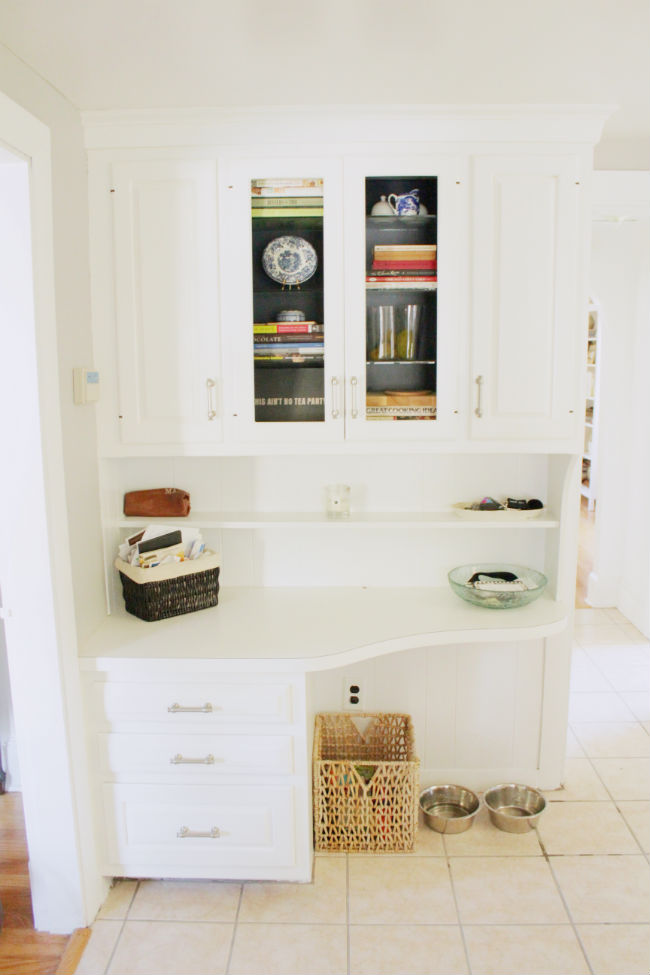
Here’s what it all looked like when it was done. (And if you’re curious, I’ve also included instructions on how to paint kitchen cabinets after the photos!).
Would you like to save this?

You can also see out into the sunroom, which I also painted. In case you missed last week’s post, here’s the “before” shot of that house of horrors.

How to Paint Kitchen Cabinets:
Step 1. Unscrew the cabinet doors.
To make life a lot easier, we numbered each door and it’s corresponding cabinet box. We used painters tape and a sharpie for this part. That way, when it’s time to put the doors back on, you know what goes where. As you remove the doors, separate out the hardware and screws into plastic baggies, again, to make life a lot easier when you go to put everything back together.

Step 2. De-glaze
Once the doors were off, we wiped both those and the cabinet boxes with a de-glazer and a rag to remove some of the finish and give everything a good cleaning (which it badly needed, apparently, judging by the color of the rag when we were done). Then, we wiped them all with a damp rag, and dried them with a lint-free cloth.

Step 3. Paint, and paint, and paint, and paint, and paint.
This is where things didn’t go according to plan. The kit specified two coats of paint. But we ended up needing five to hide all of the brushstrokes and get a smooth finish. This required an extra trip to Home Depot to purchase a second Rustoleum kit (since you can’t just buy the paint itself). The good thing about the paint, though, is that it dried pretty quickly, so we were able to paint continuously, because by the time we’d finished a coat on the last cabinet, the first one was ready for another one.
Step 4: Top coat
The last step in the painting process was the application of a top coat, which makes the cabinets stain proof, and able to be wiped down without the paint coming off. This went pretty quickly.

Step 5: Hardware
Once everything was dry (we waited about four hours), it was time to put on the new hardware. I got brushed nickel hardware at Lowe’s (I wanted polished nickel, but there was nothing in the right size, and I didn’t want to have to fill in the old hardware holes and drill new ones. In the end, it looked great!). I thought I measured correctly, but when I got home, the hardware was off about an eighth of an inch, so I couldn’t screw it on. My solution was to just drill all of the existing holes a bit larger, which worked out, but wasn’t ideal, since it tacked on a couple of hours to what should be the easiest part of the job. Womp, womp.
Step 6: Put it all together.
This is the best part. We screwed everything back on, and thank God we numbered everything because otherwise it would have been like one of those puzzles on The Amazing Race, where the people come up to a pile of stuff, with no instructions, and they have to figure out what goes where and it takes them like six hours and they lose the whole game. (Note: since we painted both sides of the cabinets, I just kept switching the number to whatever side I wasn’t painting).

All in all, I’d recommend the Rustoleum kit, since it came with everything you’d need, plus a how-to DVD, and detailed instructions, all of which were key, since I’d never done this before (and hopefully will never have to again). A few things I learned during the process:
-This is not a one woman job, so make sure you can rope in your mom, boyfriend, BFFL, neighbor, whoever to help.
-If you’re going from dark to light cabinets, you’ll probably need 4-5 coats of paint to really cover everything.
-Choosing hardware that’s the same length as your current hardware would make the process a lot easier.


The cabinets in my kitchen are really starting to fall apart. It definitely makes my house look ancient. I think that if I got new cabinets my house would look a lot more modern and classy. I wonder how much they usually cost to have installed.
Eliza Lawrence | http://www.ksquaredconstruction.com/cabinetry
Personally, I’d say rub that paper stuff down with 1:1 diluted liqiud fabric softener, wait 10 minutes, and scrape away however, first make sure that there’s actual wood or metal under there, not particle board or MDF. Spray any remaining glue (since it might not all be the usual wallpaper glue) with goof-off or some other glue solvent. Then clean up and paint.However, as you’re in an apartment and this is probably not something you really want to invest time and effort in making “like new”, I suggest lightly sanding the wallpaper stuff, wiping clean, and sticking contact paper to it. There’s already a grid drawn on the back of the paper so it’s pretty easy to count out the inches and cut straight. You can buy it in rolls for $1 per 0.5 to 4 linear ft by 18″ wide, depending on what color/finish you want. In comes in a lot of looks, from stainless steel to blue toile to fluorescent yellow. The paper will give you a totally clean surface and it’s pretty cheap, so you can literally coat the entire inside of the cabinets, if you want to. Best of all, it won’t shift around and it’s pretty durable.