DIY Diffuser – How to make a room diffuser

Would you like to save this?
There are lots of reasons to make a DIY diffuser, but the two biggest are: saving money, and creating a less-toxic home fragrance.
I was motivated by both when I started making my own room diffusers.
I’ve talked before about my love of Le Labo’s Santal scent, and how I’d probably bathe in it if I could. After buying all sorts of Santal candle dupes for a few year, I decided to switch to diffusers as a less-toxic way to fragrance my home. But, again, the Le Labo Santal diffuser is around $100/oz. So, I decided to make my own.
Luckily, I was able to find a Santal essential oil on Amazon that is almost an exact dupe for the Le Labo scent, but only cost $17.99/oz. I was in business.
The rest of the process is actually super easy and requires very few ingredients, many of which you probably already have at home.
So let’s jump in.
How to make a DIY diffuser
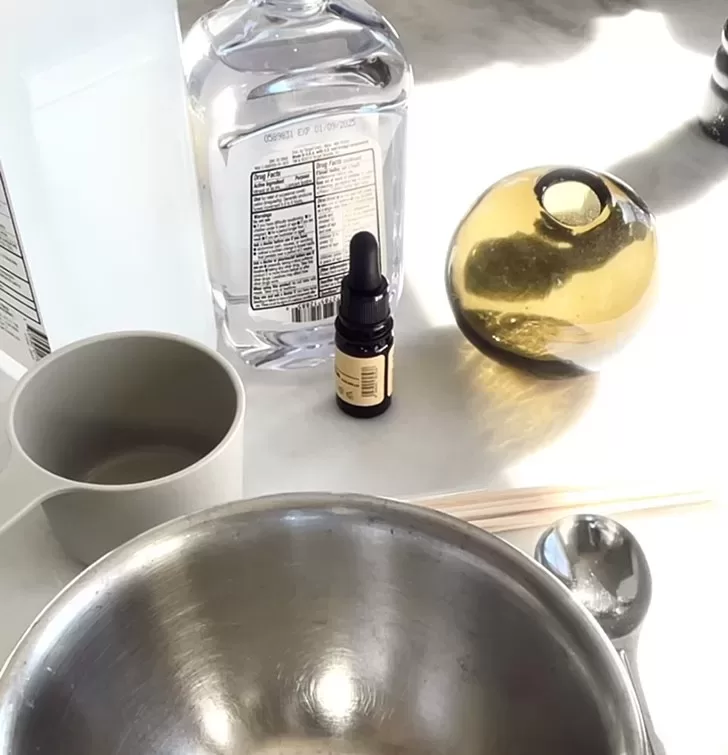
First, you’ll want to gather your supplies.
What you’ll need
- 20-40 drops of essential oil or fragrance oil of your choice
- 1/4 c. mineral oil (or other oil like jojoba, safflower or sweet almond)
- 1 tsp. rubbing alcohol or plain vodka
- Small bowl
- Small glass jar, preferably with a narrow mouth, like a bud vase
- Reeds
- A small funnel
Not much to it, right?
Some recipes don’t call for any alcohol, but I add it to my DIY diffusers because it’s supposed to help the reeds absorb the fragrance mixture and help disperse the fragrance. If you don’t have rubbing alcohol, you can also use vodka, or skip the alcohol altogether.
I also chose this dark-colored glass bud vase because darker colored glass is supposed to block more light, and thus keep fragrance from breaking down as fast. However, if you only have a clear glass jar, that will also work perfectly fine.
DIY reed diffuser instructions
So this part is actually incredibly easy.
To make your reed diffuser oil, you simply measure out each of your ingredients, pour them into a bowl, and give them a quick whisk. After that, pour the mixture into your diffuser jar (I used a small funnel to make the job a little cleaner). Then, add your reeds, and you’re done!
What liquid goes in a reed diffuser?
The liquid you put in your reed diffuser is called the carrier oil. For my reed diffuser, I used mineral oil as my carrier oil. I had some on hand from another project, so I just used that. It’s the Target-brand mineral oil, but you can also use the mineral oil that’s meant for conditioning cutting boards, as well as safflower oil, unscented baby oil, or sweet almond oil.
Technically, that’s all you need, but I also use a splash of rubbing alcohol (vodka also works!) to help the reeds absorb the liquid.
How do I make my reed diffuser scent stronger?
If your DIY reed diffuser isn’t very strong, there are a couple of things you can do to fix it.
First, I find that when I first start using a reed diffuser, it takes a little while for the reeds to absorb the oil and start dispersing the scent. So, in the meantime, I will usually flip a few of the reeds over, so the saturated ends that have been soaking in the oil stick out at the top of the diffuser. That helps make the scent stronger for a while.
The other thing you can do is add a few more drops of your fragrance oil to the diffuser. Different fragrance and essential oils have different strengths, so you may need to add more (or less) depending on the potency of your oil.
Can you use skewers in a reed diffuser?
For my reed diffuser, I used fiber reeds that I bought on Amazon. However, if you happen to have a set of bamboo skewers or even chopsticks on hand, both will work for your reed diffuser in a pinch. Because both chopsticks and skewers will be more dense than diffuser reeds, it’ll take a little longer for the fragrance to permeate and disperse.
For more DIY projects, check out: