How to Paint a Bed Frame For a Durable and Stylish Finish
Learn how to paint a bed frame the right way, for a look that stands the test of time.
Would you like to save this?
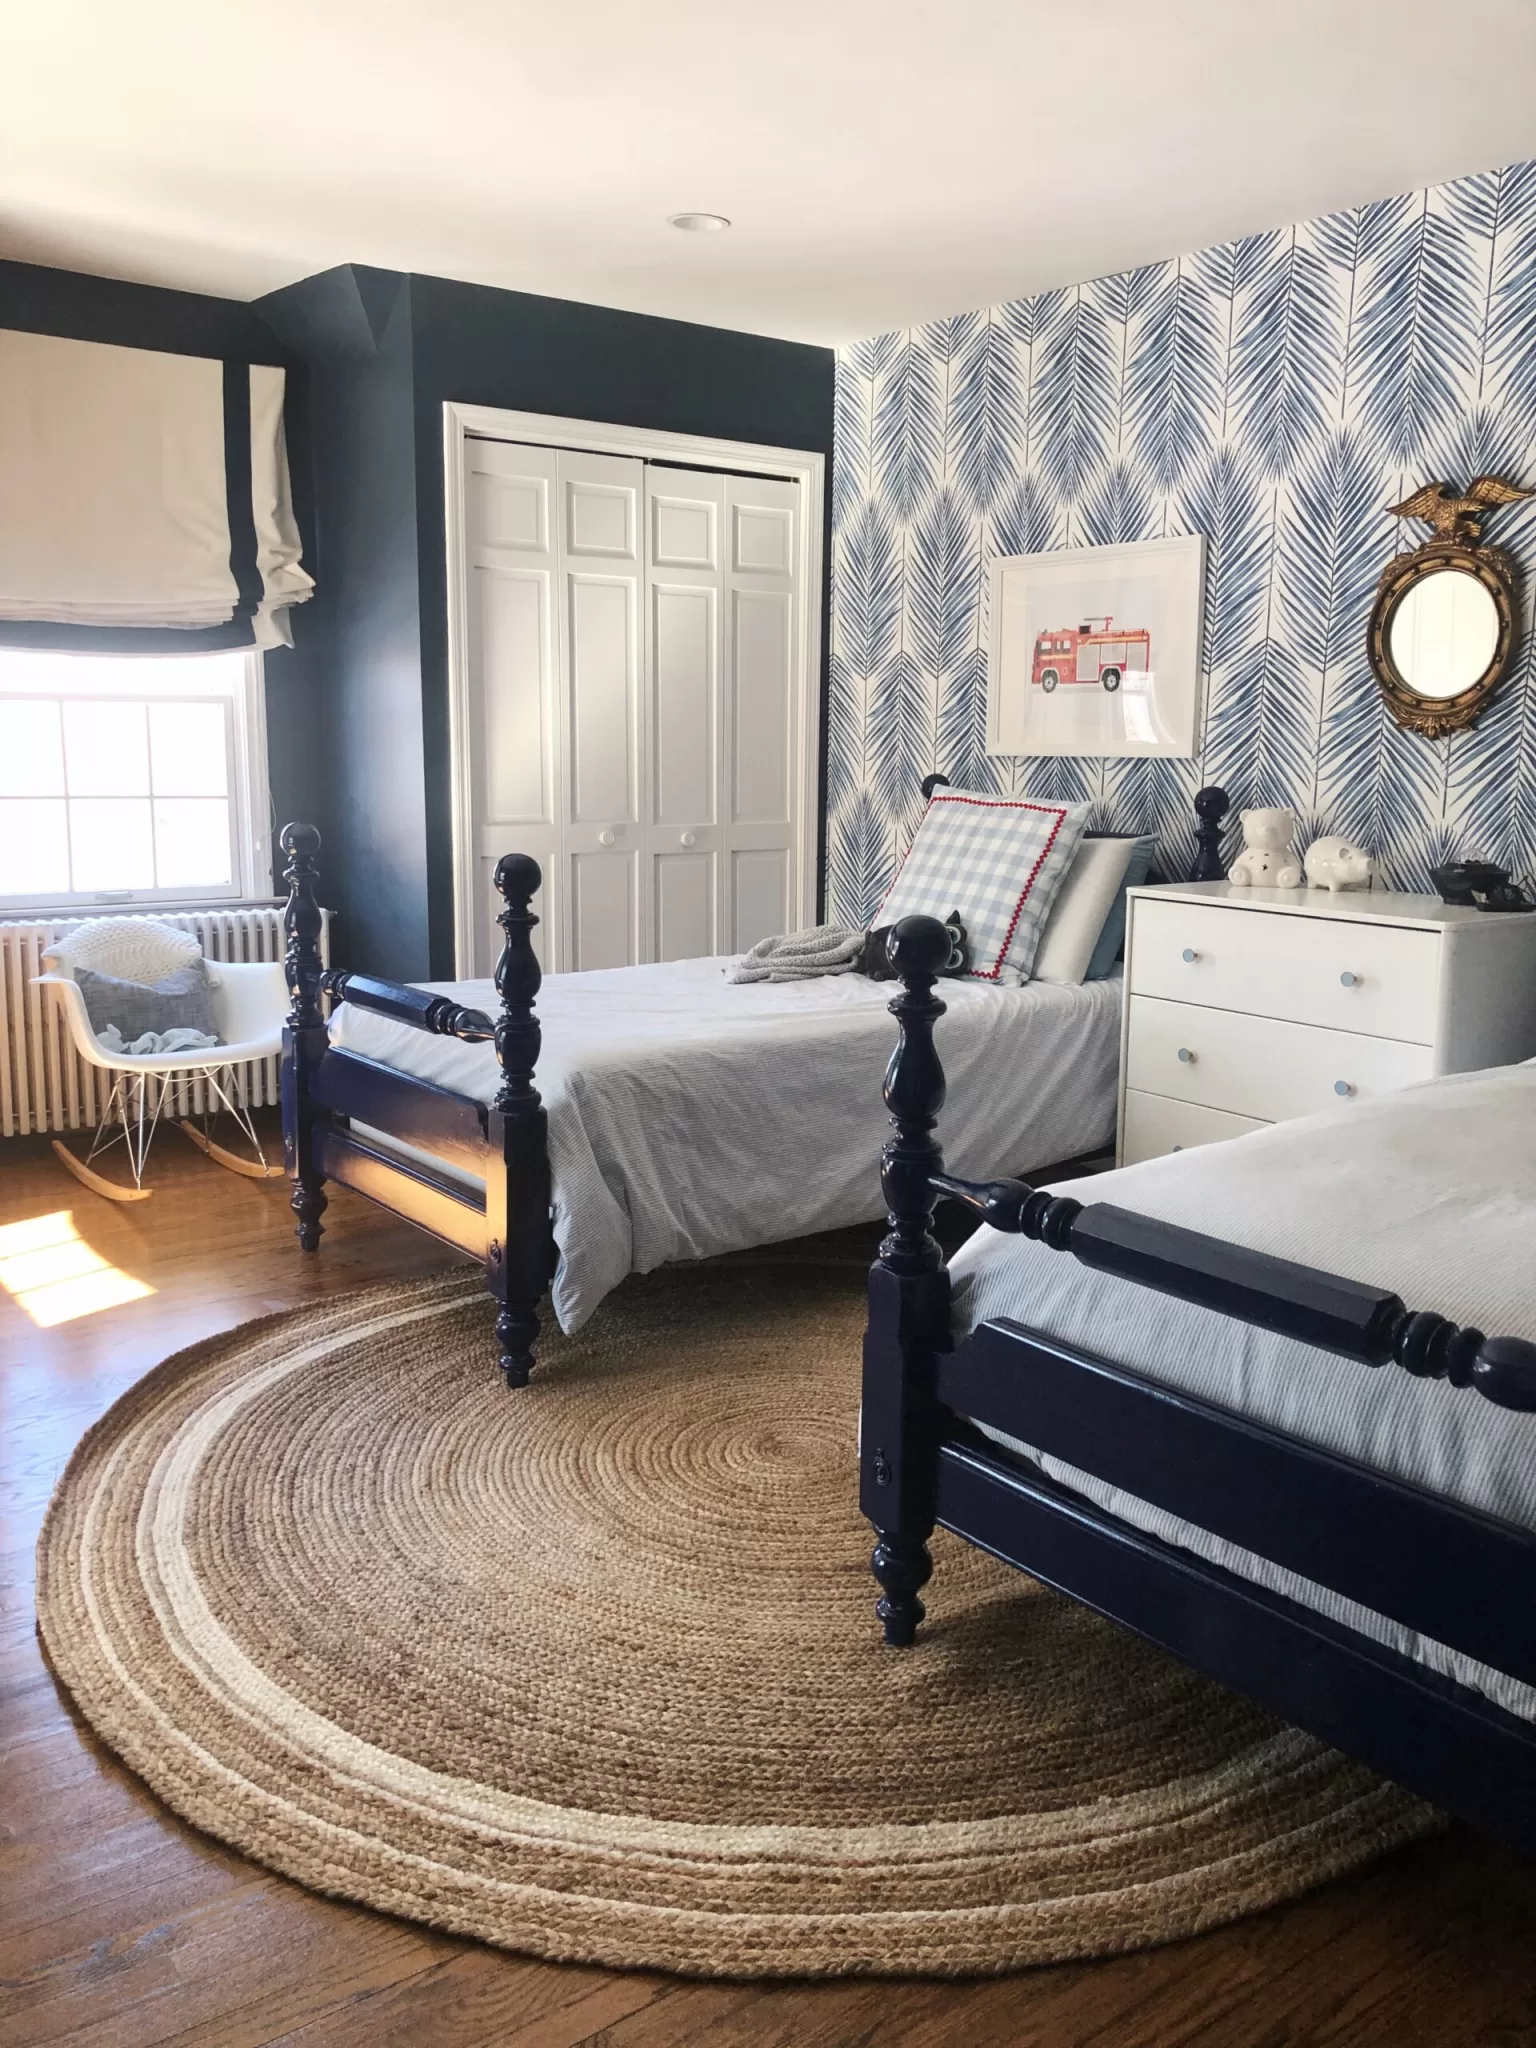
Painting a bed frame can be a cost-effective and beautiful way to update the look of a room, or to get a bed frame that coordinates perfectly with your space. When I was searching for twin beds for my sons’ room, I wanted something that felt antique, but also fun enough for a kids space.
When I came across a pair of beautiful old cannonball-style wood bed frames on Facebook marketplace for $100, I knew they’d be perfect with a few coats of navy blue paint. I ended up painting them back in 2020 (and I just never thought to write a post about it until now, because I recently sold them on FB Marketplace for $300!), and they still look nearly perfect in 2023.
Here’s how I painted them to get a lasting, durable finish.
How to paint a bed frame

They key to painting a bed frame, especially one that would be going into a kids room, is to get a finish that lasts. This means properly prepping the bedframes, and choosing products that ensure durability.

I ended up going with high-gloss furniture paint because I wanted the beds to have an almost-lacquered look. High-gloss finishes are also durable and wipeable … but, they’re also among the hardest to get right, since high-gloss paint shows the most imperfections. If you’re new to DIY, a flat or eggshell finish will be easier to work with. Still, I’ve listed out how I got the high-gloss finish if you love that look and want to give it a shot!
Painting a wood bed frame: What you’ll need
- Liquid sandpaper or regular sandpaper
- Microfiber cloth
- Spray Primer (regular brush-on primer works, too, I like Zinsser 1-2-3)
- Fine grit sandpaper (I used 220 grit)
- Rustoleum Painter’s Touch Ultra-Cover (Or furniture paint of your choice – More on my favorite furniture paints here)
- Rustoleum spay paint – I used high gloss
- Polyurethane in your finish of choice
- Small foam paint roller
- High quality paint brush
How to Paint a Bed Frame Step By Step
Step 1: Clean and “sand”

The first step is to prep the bed. This is important, because it helps the paint and primer to properly adhere to the frame. Typically, I use a hand-sander to sand furniture, but when there is a lot of detail or curves on a piece, I use liquid sandpaper instead. You just pour it on a microfiber cloth and give the entire piece a good wipe down. (If you prefer to use regular ol’ sandpaper, this works, too. Start with a coarser grit, like a 120, and then finish with a smoother grit, like a 220).
After that, give it another wipe with a clean, damp microfiber cloth and let the bed dry completely.
Step 2: Prime

The next step is to prime the entire bed frame. Again, because there were a lot of curves on my beds, and because I wanted an oil-based primer to ensure the best coverage, I used a spray primer (Rustoleum 2x Ultra Cover Primer). It was kind of a paint to cover the entire bed using a spray primer, I’m not gonna lie. But, the effort ended up being worth it in the end.
Step 3: Lightly sand and wipe
After the primer was dry, I lightly sanded the beds with a 220-grit sandpaper which removed any drips and overspray areas. Then, I gave the beds another wipe with a clean, dry microfiber cloth.
Step 4: Start painting

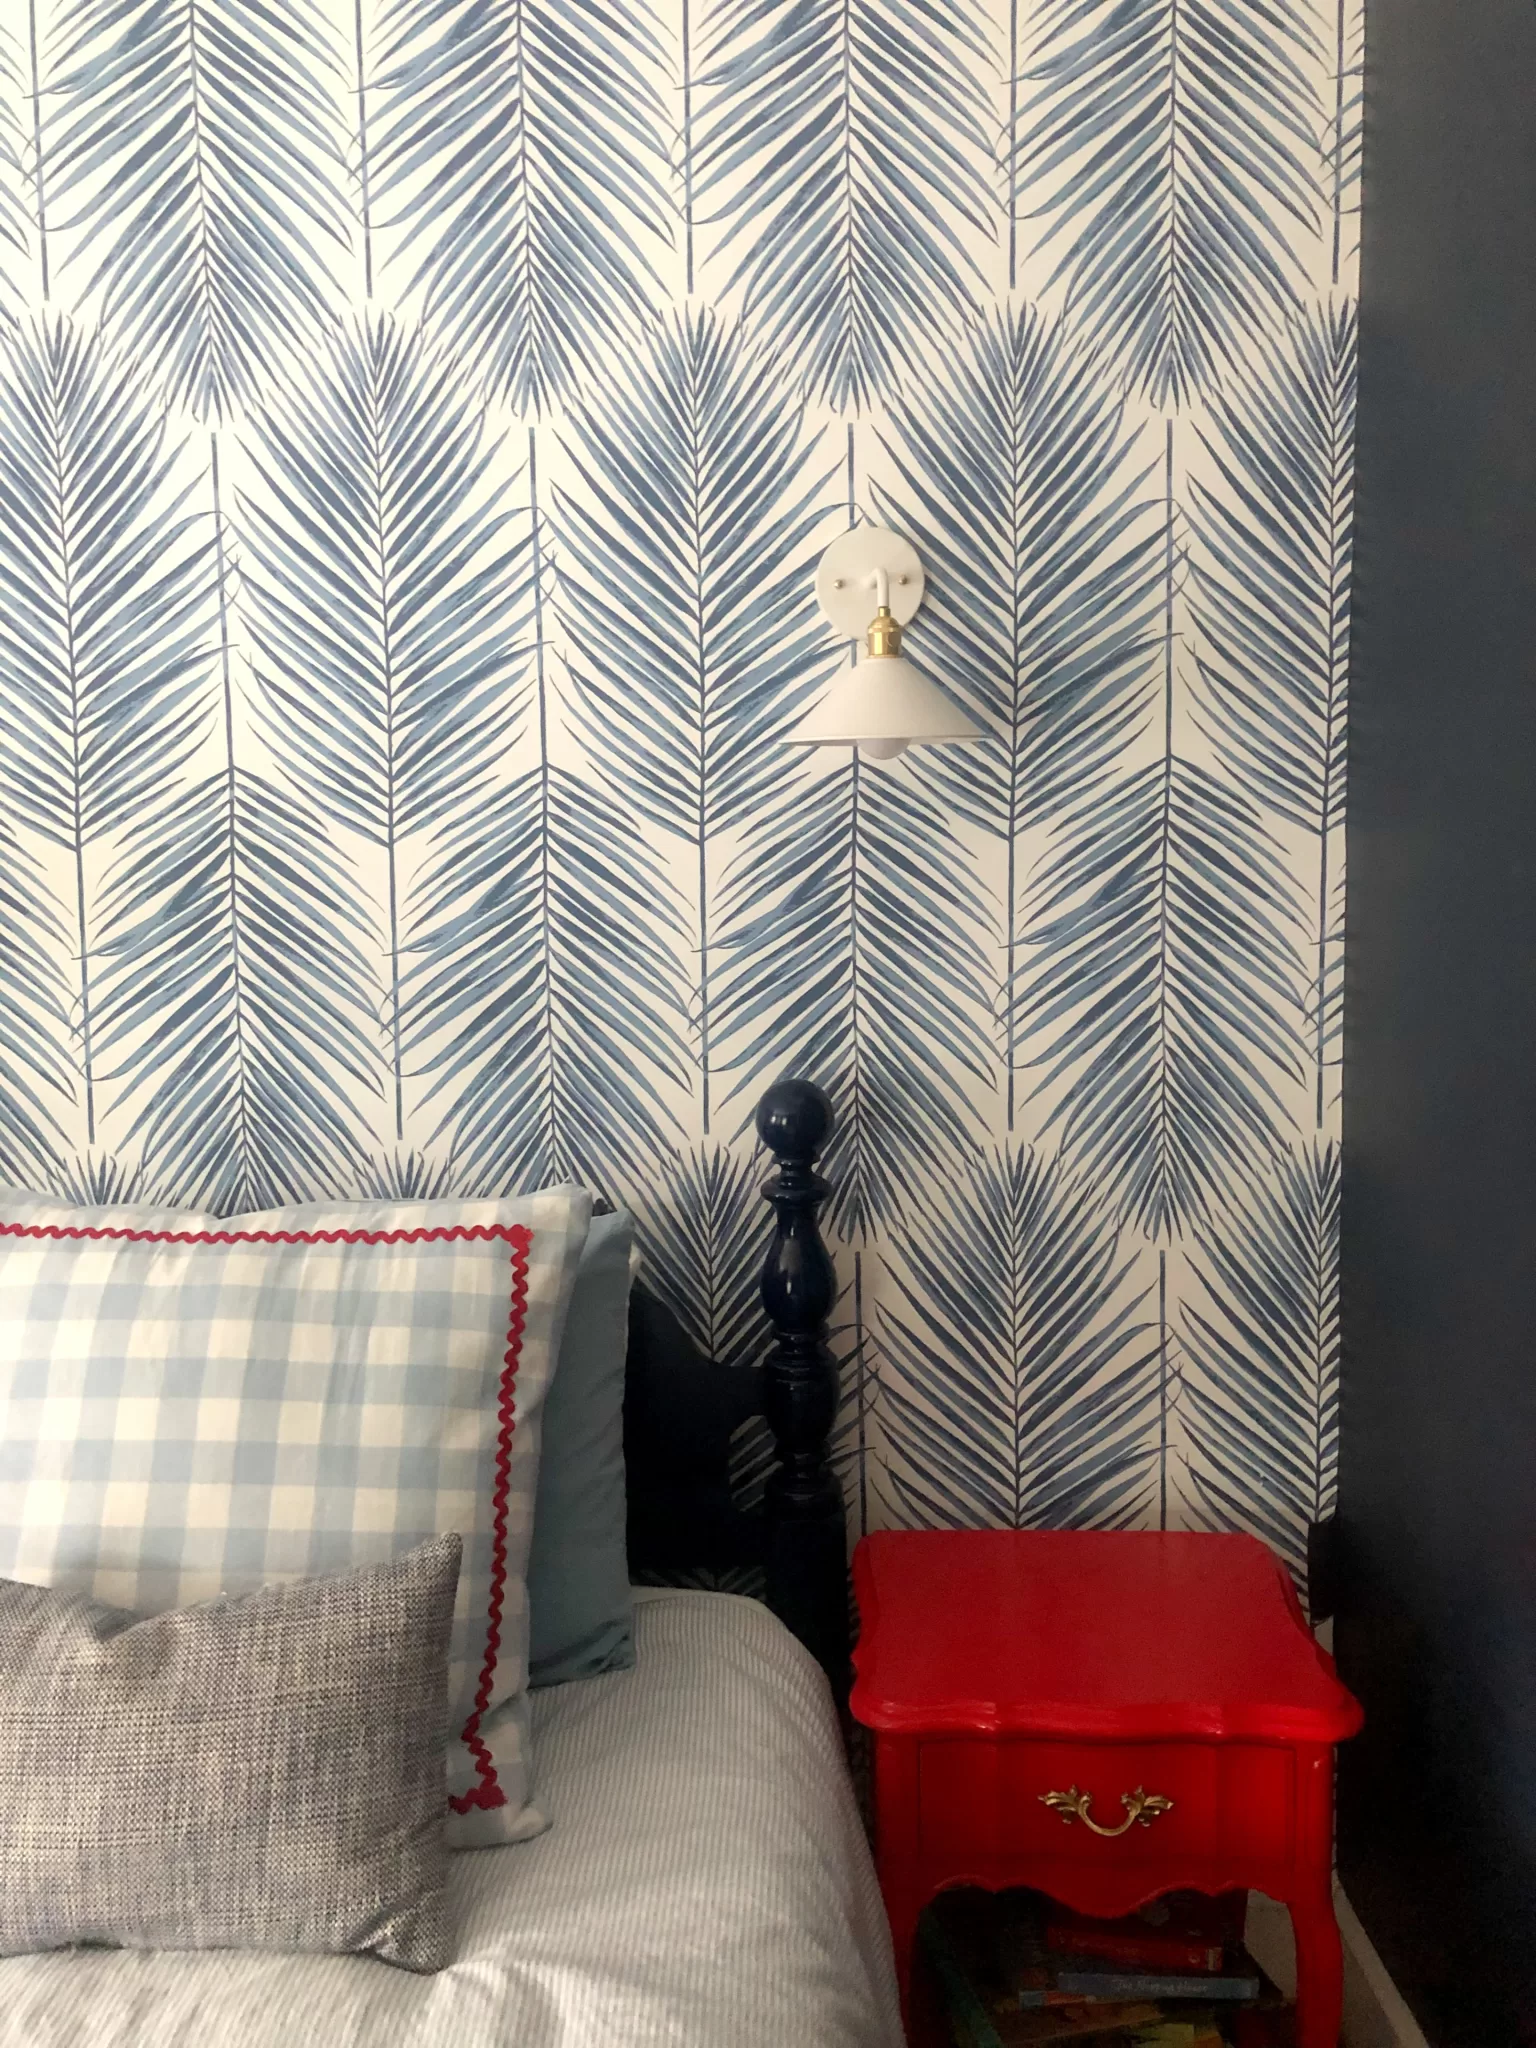
Once the primer is dry, it’s time to start painting. I used two types of paint for my beds: For the flat areas, I used Rustoleum High Gloss Furniture Paint. And for the spindles and rounded areas, I went with Rustoleum High Gloss Spray paint.
The reason I chose the Rustoleum paint was because they have a matching spray paint and furniture paint, and I knew I wanted to use spray paint on the spindles to make them look lacquered. Spray paint tends to give a smoother, more glass-like finish. I decided against painting the entire bed with spray paint because it takes longer, and after spray-priming the beds I’d lost some of my energy for spray paint 🙂
I started with the regular brush-on paint, which I applied with a small foam paint roller for smooth surfaces. One of my best tips for painting furniture is to do thin coats. It may mean doing 2-3 coats but the results are better. Between coats, check for any drips and sand them off.
After that, I moved to the spindles. I used spray paint to apply multiple thin coats. If you are new to spray painting, give my spray painting tips post a read, to help you get the technique down properly before you start. Also: Always use spray paint outside or in a very well ventilated area, and wear a respirator!!
Step 5: Polyurethane
Once you’ve applied your final coat of paint, let the bed frames dry completely. Then, you’ll do your polyurethane coat. Now, some people may argue that you don’t need polyurethane with furniture-grade paint or spray paint, but I really believe it’s what has made these beds hold up for years without chipping.
I did the same thing with the poly that I did with the paint: I used the brush-on kind from a can for the flat areas, and spray primer for the spindle areas. I chose high gloss for both.
For brush-on polyurethane, I always choose water-based (I like Varathane Water-Based Polyurethane, which you can get at Home Depot in a variety of finishes) since the oil-based stuff just smells awful. If you choose water based, you’ll need to do three thin coats. Varathane makes a 1-coat water-based polyurethane, but I actually find that harder to use since you have to apply it perfectly the first time, and if you don’t smooth it completely any excess will dry a white color.
Step 6: Let Cure

Once your beds are done, you’ll need to let them cure fully for a while before setting them up. I let mine cure in my garage for a full two weeks, which also gave them a chance to off-gas before I set them up in a kids room. If you rush this process, it’s sort of like leaving the nail salon before your nails are completely dry, and you risk messing up your paint job.
That’s it! Like I mentioned, after painting my wood beds, they lasted in near perfect condition in my sons’ room for three years.


very well explained. im going to do exactly what you recommended.
thank you
nancy B.